
Part 1: Create and Sync Embeddings (OpenAI and Milvus/Zilliz Connector)
We will start by deploying one Pulsar Function (Embed1) and one Kafka Connector (Milvus Connector) to create embeddings and upsert them to our Zilliz database.

The video to the right is a high level overview of deploying and testing the Pulsar Function and Milvus Connector.
Deploy Embed1
Code for this example can be found in streamnativerag2 class CreateEmbedding.
To deploy:
- Navigate terminal to the folder containing streamnativerag2.zip.
- Execute the following pulsarctl command. Be sure to edit the tenant in three places in the command where you would like to deploy the Pulsar Function (–input, –output, –tenant).
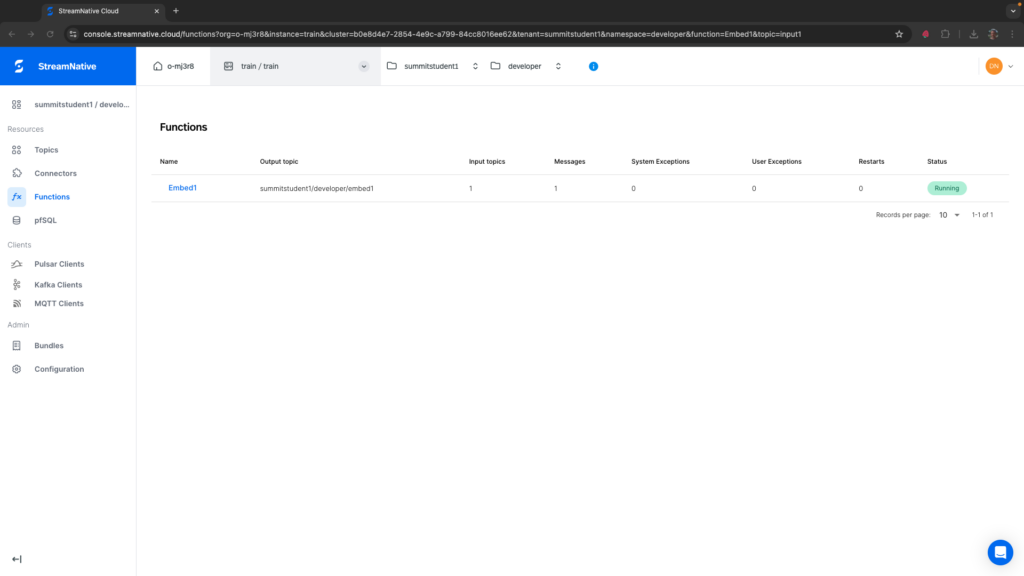
pulsarctl functions create --classname streamnativerag2.CreateEmbedding --py ./streamnativerag2.zip --inputs summitstudent1/developer/input1 --output summitstudent1/developer/embed1 --tenant summitstudent1 --namespace developer --name Embed1 --secrets '{"OPENAISECRET": {"path": "myopenaikey", "key": "apikey"}}'If the Pulsar Function starts deploying, you should see:
Created Embed1 successfullyIt may take a minute or two for the function to deploy. Once fully deployed, you should see Embed1 has a Status of Running. If you see any System Exceptions, view Troubleshooting Pulsar Functions.

The Python Function will make a call to OpenAI to create a vector embedding with model=”text-embedding-3-small”. This has a vector size of 1536 which we used when creating the field for storing the vector in the Zilliz collection.
Test Embed1
To test our Python Pulsar Function, we need to produce a string message to the topic specified in the –inputs field of the pulsarctl functions create command. In the example above this is summitstudent1/developer/topic1. This can be done easily using the Rest API with a walkthrough available here.
We start by publishing a message describing an animal.
curl -X POST https://<SERVER ENDPOINT>/admin/rest/topics/v1/persistent/summitstudent1/developer/input1/message \
  --header 'Authorization: Bearer <JWT TOKEN>' \
  --header 'Accept: application/json' \
  --header 'Content-Type: application/octet-stream' \
  --data-binary 'Cats can be many different colors.'
If the Pulsar Function triggered, you should see 1 in the Messages column.
If you see any System Exceptions or User Exceptions, view Troubleshooting Pulsar Functions.
We will use the UI to check the results in the output topic. Navigate to the correct tenant and namespace where you deployed the Pulsar Function. Select the embed1 topic.
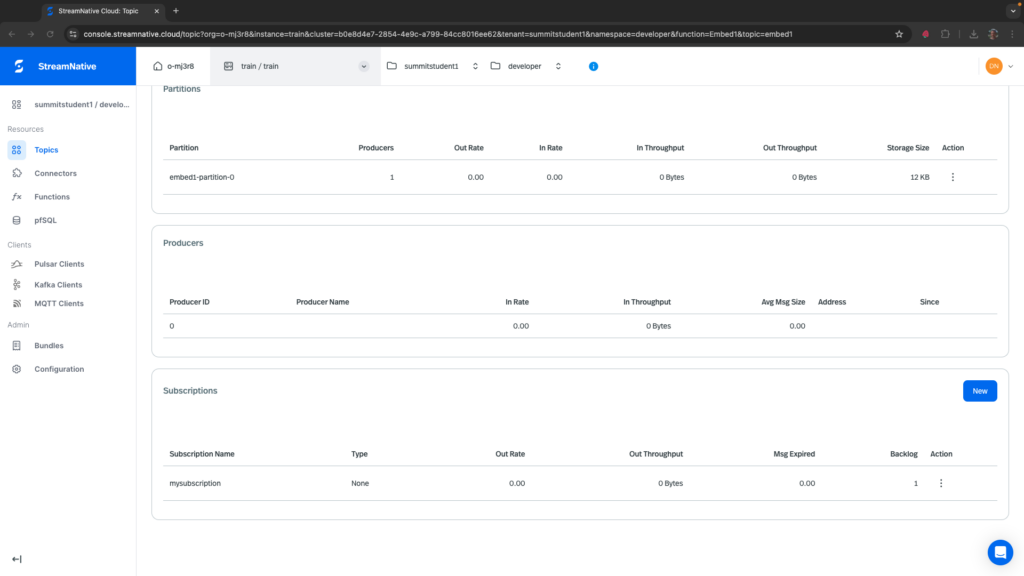
Before trying to peek at the messages, be sure you see some bytes in the Storage Size. While messages written to a topic without a subscription are by default eligible for deletion, they would not normally be deleted right away. If the storage size is still zero right after triggering the Pulsar Function, this could be a sign that the Pulsar Function did not produce results to the output topic correctly. View the section on Troubleshooting Pulsar Functions for more information.

To peek at the messages, navigate to the Details tab and create a subscription at the bottom of the page. Here I created a subscription called mysubscription and there is one message in the backlog.
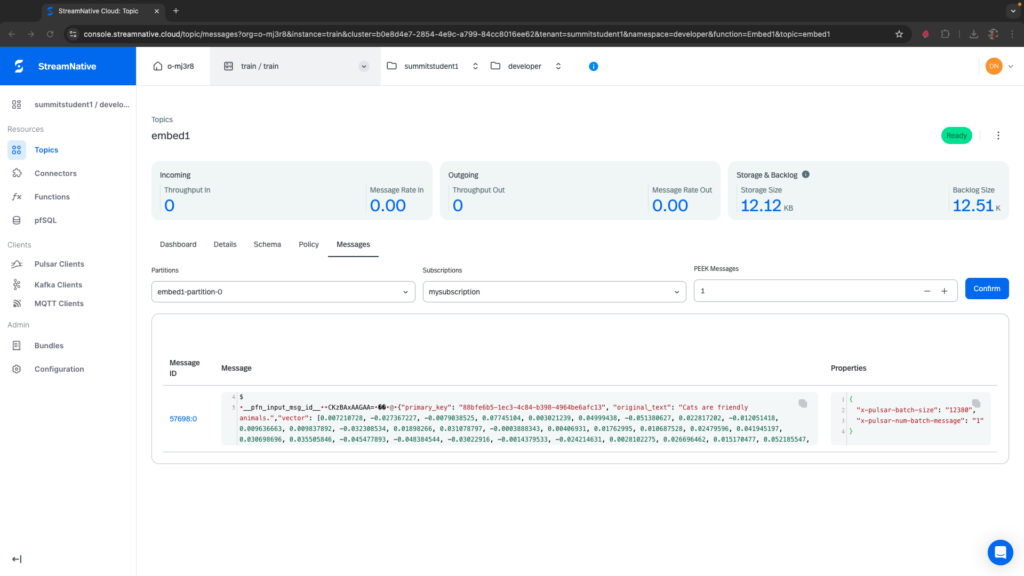
To view these messages, navigate to the Messages tab, select the partition embed1-partition-0, the subscription mysubscription, and select a number of messages to peek. You should see the message in JSON format with primary_key, original_text, and vector fields.
In the next section we will upsert this vector to our Zilliz collection using the Milvus Connector.
Deploy Milvus Connector
Be sure you have already created a Zilliz database and collection with fields described here.
Navigate to the Connector tab in the left pane and select Kafka Sinks. Unlike Pulsar Connectors, Kafka Sinks and Sources will always be deployed into the public/default tenant/namespace regardless of your UI navigation.
Select + Create Kafka Sink and choose the Milvus Sink Connector.
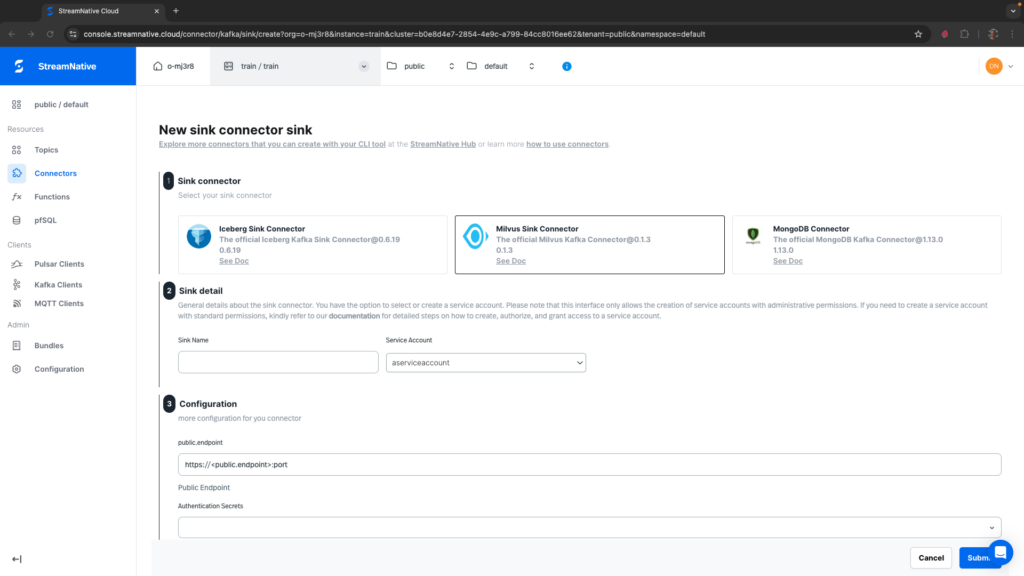
Provide the following details:
- sink name (e.g. mysink)
- service account with service account binding (use the account we made with super-admin privileges)
- public.endpoint (copied from Zilliz cluster page)
- Authentication Secrets (create a new secret for the connector with the Zilliz cluster token)
- collection.name (mycollection)
- topics (summitstudent1.developer.embed1, since this is a Kafka Connector use “.” as the separator)
- In advanced settings, in Value converter configuration, add value.converter.schemas.enable to false

After submitting the Milvus Sink Connector, wait a few minutes until the Status shows as Running.

Test Milvus Connector for Zilliz
To test the Milvus Connector for Zillis, repeat the process of publishing a message to input1. This will trigger Embed1 to write the vector to embed1.
curl -X POST https://<SERVER ENDPOINT>/admin/rest/topics/v1/persistent/summitstudent1/developer/input1/message \
  --header 'Authorization: Bearer <JWT TOKEN>' \
  --header 'Accept: application/json' \
  --header 'Content-Type: application/octet-stream' \
  --data-binary 'Cats can be many different colors.'
Note: if you try to view the subscriptions on topic embed1, you won’t see a subscription for the Milvus Connector. The Milvus Connector uses the Kafka protocol and Kafka subscriptions are not currently displayed in the UI.
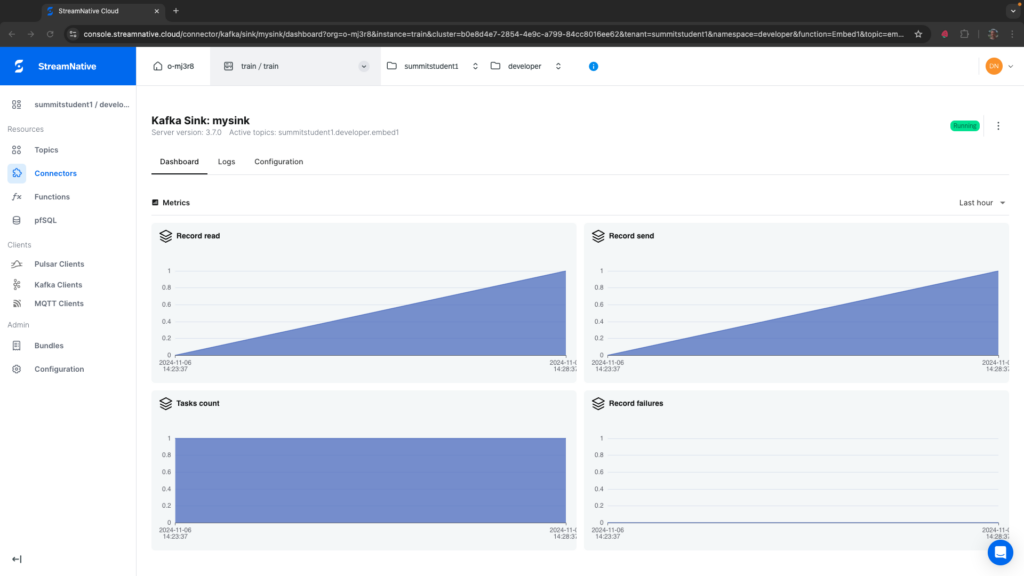
Clicking on the name of the connector brings us to the Dashboard for the connector. You should see 1 for Record read and 1 for Record send.
To confirm the vector is persisted in Zilliz, navigate to Data Preview of the collection.

You can now use Rest API to upsert more data to topic1. Add information about different types of animals. This is in preparation for creating a similarity search in the next exercise.