
Cluster Setup, Service Account, and pulsarctl
For all examples in this course you will need a StreamNative cluster and a service account for deploying the Python Pulsar Functions and ultimately creating your streaming AI workflows. The Python Pulsar Functions are deployed using pulsarctl. This lesson will guide you through this process if you don’t already have a StreamNative cluster.
Many examples require access to AWS Bedrock or AWS RDS, OpenAI, or a Milvus database from Zilliz. Access to these resources is not provided by StreamNative. However, we provide high level instructions on configuring these external resources to be compatible with the code samples.
1. Deploying Cluster with $200 Free Credit
You will not need to input a credit card to use the $200 Free Credit.
If you also plan on testing Kafka, be sure to deploy your cluster using the Rapid Channel. If you deploy a Serverless Cluster, it will automatically use the Rapid Channel.
2. Create Admin Service Account and Binding
To get started quickly, let’s first create a super-admin service account and download the OAuth2 Key. We will use this key to connect to the cluster when deploying Pulsar Functions using pulsarctl. This account has a very high level of privilege. It’s also possible to use a non-admin service account to deploy Pulsar Functions by providing tenant admin access, or specific privileges on the namespace. This will not be discussed in this course.
We will also create a service account binding for the service account, allowing this account to be used for deploying Pulsar Functions and Connectors.
In the video we download an OAuth2 Key. You should also create an API Key. This will be used throughout the course when testing Pulsar Functions using the Rest API. Be sure to save a copy of the API Key. If you lose it you can always just create another one!
3. Installing and Configuring pulsarctl to Deploy Pulsar Functions
We will be using pulsarctl from your local machine to deploy Python Pulsar Functions to the StreamNative cluster.
Please download and install pulsarctl using the directions here.
After installing pulsarctl, follow the directions to create a context (edit –key-file to point to the OAuth2 json file for your service account). To help in filling in your –admin-service-url and –audience, you can navigate to Pulsar Clients in the StreamNative UI. Click on CLI Tools and pulsarctl. The Client configuration will be pre-populated with your cluster information.
pulsarctl context set train  \
    --admin-service-url <SERVER URL> \
    --issuer-endpoint https://auth.streamnative.cloud/ \
    --audience <AUDIENCE> \
    --key-file file:///YOUR-KEY-FILE-PATH

pulsarctl oauth2 activate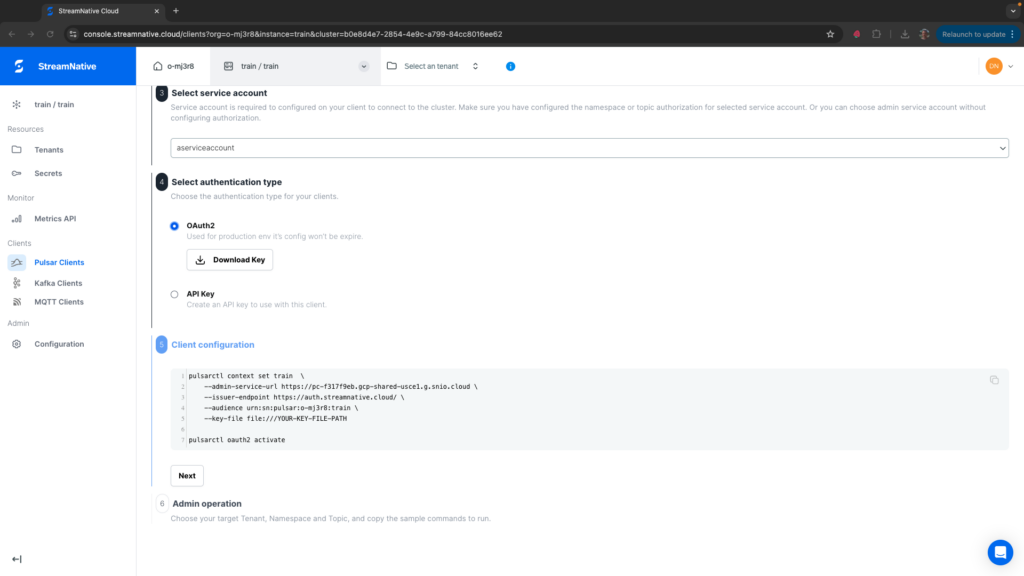
The connection isn’t tested until you execute pulsarctl oauth2 activate. If you are connected successfully, you should see the following:
dustinnest@Dustins-MacBook-Pro pythonexamples % pulsarctl oauth2 activate
Logged in as summitstudent1@o-mj3r8.auth.streamnative.cloud.
Welcome to Pulsar!
To test pulsarctl, try executing a search for namespaces in the public tenant. You should see the following namespaces in the public tenant:
pulsarctl namespaces list public

+-------------------------------+
|        NAMESPACE NAME         |
+-------------------------------+
| public/__kafka                |
| public/__kafka_schemaregistry |
| public/default                |
+-------------------------------+
Throughout the course, examples are shown deploying to a specific tenant and namespace summitstudent1/developer to show you how to deploy to a tenant and namespace other than public/default. You can either switch the code examples to public/default or create a tenant and namespace called summitstudent1/developer in your cluster.